Just stumbled across this website today, the MAXDEPTH page include tutorials and tips/tricks for rendering in both V-Ray and Arnold, as well as a little bit of Zbrush and Mari as well. Looks like a pretty good resource :-)
Also, Grant Warwick's Mastering V-Ray is another good V-Ray resource. The full course costs money, but even the 2 free videos he has posted on the page are quite useful. And although he uses V-Ray for 3ds Max, the general principles are the same and can be applied to V-Ray for Maya (for the most part).
Monday, August 11, 2014

Monday, July 28, 2014
V-Ray Material Resource
Came across this excellent resource on the basics of V-Ray materials with renders to illustrate the different attributes. The whole website (viscorbel.com) is overall a good resource. The V-Ray tutorials are all for 3ds Max, but I found most of the principles applied for V-Ray in Maya as well.
http://viscorbel.com/vray-materials-theory/
http://viscorbel.com/vray-materials-theory/
Sunday, July 20, 2014
Character Updates
So my characters are pretty much done! Only things left to do are: n-cloth for the clothes, which will be done after rigging/posing; hair, which I am still figuring out how to do; some surface detail on the girl's sweater, which I may end up combining with the texturing process; and the little girl's shoes, which I'm having to re-do no thanks to some major wonky geometry/zbrush issues (which thankfully have been mostly resolved). At this point I'm thinking that fiber-mesh will be the best option for hair. I was examining Rockwell's illustrations, and while his characters tend to be slightly stylized or caricatured, the hair is fairly realistic. Sculpted hair would be much too stylized, and while there is the option of painting transparency maps on planes, it tends to lend itself to "neater" hairstyles, whereas my characters both have messier hair. An added benefit of using fiber-mesh is that since I will have to convert it to geometry in order to have it be compatible with all the render engines, it will allow me the opportunity to see how each one handles such high levels of geometry. While I am confident Arnold will have no issue with it, I am curious to see if Mental Ray can handle it without crashing.

Speaking of hair, obviously because she has none right now, the little girl does look a little odd. But in the few very rough tests I have done she looks much better with hair :-) The hardest part of sculpting these characters for me was trying to make sure their characteristics matched to either male or female. Even though boys and girls around this age do tend to have very similar features, they still needed to be distinguishable from each other. Their outfits are not taken directly from one Rockwell illustration, but rather pieced together from several, as I took some artistic license to envision what they would be wearing in my own interpretation of the "Tackled" piece I am using as my main inspiration.
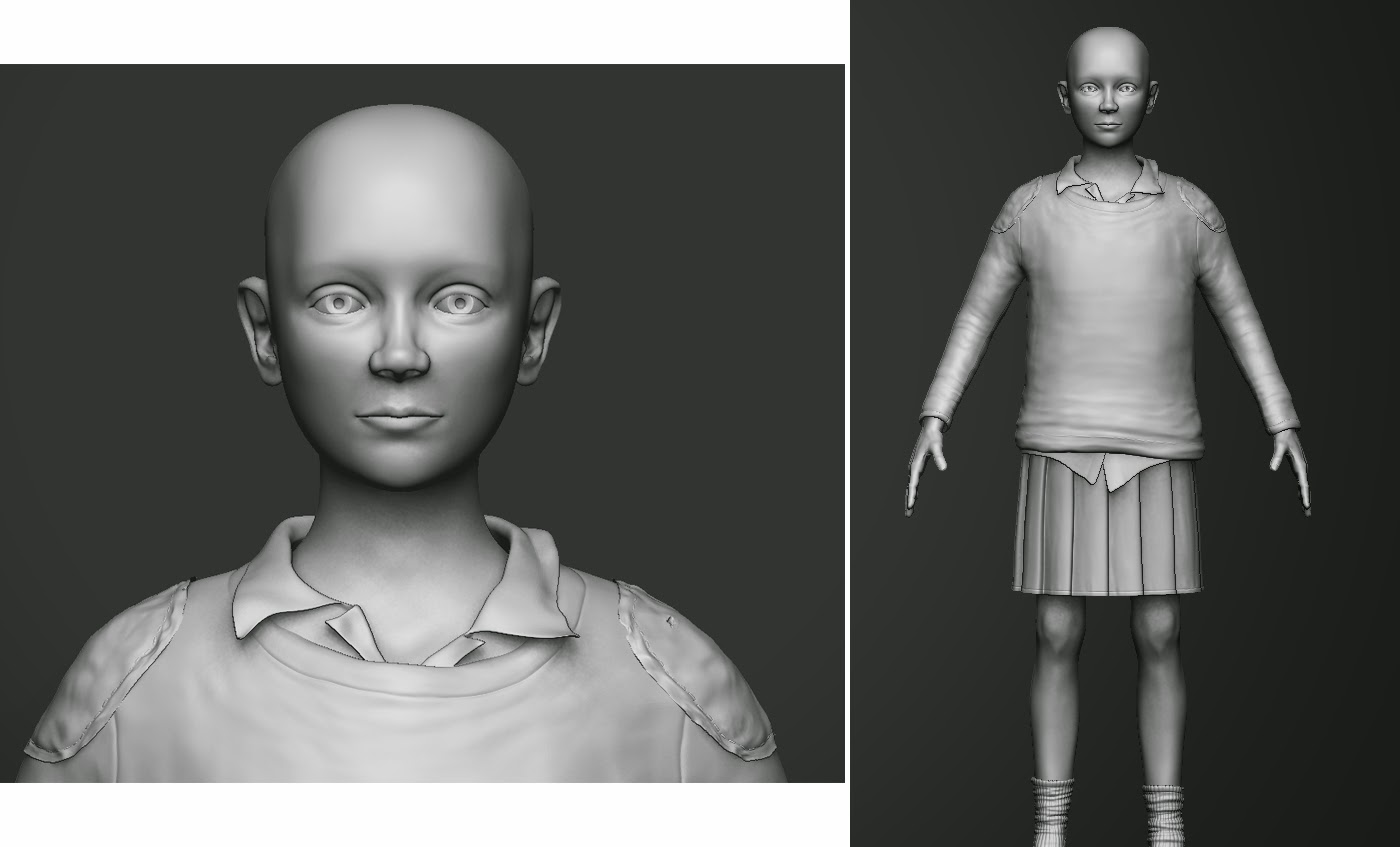
As soon as I double check all my UVs for stretching, I get to pass these guys on to be rigged, and while that's happening I get to start texturing and shading. I'm hoping that part of the process will be much quicker, since I do feel I have a better idea in my mind of what the textures should look like (whereas with the modeling I wasn't initially sure what direction I was going with the characters' final look).
Speaking of hair, obviously because she has none right now, the little girl does look a little odd. But in the few very rough tests I have done she looks much better with hair :-) The hardest part of sculpting these characters for me was trying to make sure their characteristics matched to either male or female. Even though boys and girls around this age do tend to have very similar features, they still needed to be distinguishable from each other. Their outfits are not taken directly from one Rockwell illustration, but rather pieced together from several, as I took some artistic license to envision what they would be wearing in my own interpretation of the "Tackled" piece I am using as my main inspiration.
As soon as I double check all my UVs for stretching, I get to pass these guys on to be rigged, and while that's happening I get to start texturing and shading. I'm hoping that part of the process will be much quicker, since I do feel I have a better idea in my mind of what the textures should look like (whereas with the modeling I wasn't initially sure what direction I was going with the characters' final look).
Thursday, July 10, 2014
Modeling Update - Leather Helmet
Finished up the little boy's old leather football helmet. It still needs some finer surface detail like scuffs and scratches, but again, a lot of that will be created during texturing. As of right now the only thing I need to add model wise is a chin strap (which is honestly something I'll probably do in Maya instead of Zbrush)

Monday, July 7, 2014
Modeling Update - Football
Pretty straightforward model. It looks pretty clean right now, but the extra details in the textures and a good shader will make a big difference in getting it to have that dirty scuffed look (it just has a standard zbrush material on it right now, nothing special). This one will be fun to texture :-)

Renderman!
The wonderful people over at Pixar have been kind enough to provide me with a temporary Renderman Studio 18 license for evaluation purposes, yay! Up to this point I have been using 3Delight, which is based on the Renderman rendering algorithm, and provides a free license - but is not used in the industry nearly as much as Pixar's Renderman. I got excited when I saw Pixar would be releasing a free non-commercial license of 19, but then I realized it won't be released until mid-August, much too late for my purposes. But it gave me the idea to reach out to Pixar and see if they would let me have a free license of 18 to test until 19 is released, since it's really not worth it to pay over $200 for a license I'd only use for a month. The good news is since 3Delight is so similar to Renderman, it shouldn't take too much work to switch over my test scenes, and ultimately I think I'll be much happier with my final comparison.
Thank you Pixar! :-D
Thank you Pixar! :-D
Sunday, July 6, 2014
Modeling Update - Boy Character Progress
Decided to post a WIP of the boy character where he's at right now. I'm trying to finish all my modeling by Friday (July 11), so hopefully the boy and all his assets will be done by tomorrow so I can concentrate on the girl character and all her assets. Obviously right now his sweater is just a shape block with no details added, but when it's done it should closely resemble the old beat-up sweater in the Rockwell illustration. The shorts are another area I took artistic license, choosing to go with the idea of what kids might be wearing if they chose to play an impromptu game of school-yard football. So instead of donning full gear for a serious game, they would just quickly grab a helmet, and maybe throw an old sweater over their uniform. I'm debating if I want the boy to be wearing a collared shirt or not, I may just leave the collared shirt to the girl and have the boy wear a normal crew neck shirt under his sweater, I think it will go more with the look I'm trying to achieve. I also need to break symmetry on the boots, but right now I'm trying to concentrate on getting the rest of the assets detailed before I go back and make more minor tweaks. His hands are also still feeling a bit off, I think they may be a bit too thin, so that's something else I need to tweak before I can say I'm completely done. And then lastly, still debating how I want to do hair - if I want to sculpt it, use planes with transparency, or use fibermesh.

Thursday, July 3, 2014
Modeling Update - Socks
So I took some artistic license with the socks, with the look more geared towards my own interpretation of the piece. After all the final result is basically my spin on the original Rockwell piece, recreating it to reflect aspects of my own childhood experiences. When I was a kid, we always had hand-me-down soccer socks that were either too big or so loose from being worn they would sag and fall down when we ran. So the boy's socks are based off of that, rather than Rockwell's longer, less baggy football socks.

Monday, June 30, 2014
Modeling Update - Boots!
Finished the boots for the male character. The girl character's shoes should be a quicker sculpt, since they are fairly similar in that they are worn leather, probably hand-me downs, the main difference is the style is a lower cut shoe as opposed to an actual boot. I had a fun time making these boots, I've tried modeling shoes in Zbrush before and never had very good results, but I'm pretty pleased with the way these came out :-)
Modeling Reference
Obviously I tried to get as close as possible to the boots illustrated by Rockwell (far left), but since it's a bit more stylized not all the details are visible, so I had to look for similar boots to get reference for some of those smaller details

Boot UVs and Low-Poly Mesh
This will be a good model to test displacement on, typically if was using Mental Ray I would export my next subdivision out of Zbrush, which has a slightly higher poly count and tends to hold displacement details better.

High Poly Zbrush Sculpt
I'll probably end up doing another fine detail pass to layer on top of the existing bump/displacement, but I prefer to make that last pass at the same time as I'm texturing, since alot of the details will come from the color map and it helps me determine how much more detail I need to add to the bump/displacement.

Texture Reference
Obviously the next step for the boots is texturing. Again I will be trying to match as closely as possible the boots pictured in the Rockwell illustration, but I will definitely need leather references to create the final look. These worn leather swatches are fairly close to the look I want.

Friday, June 27, 2014
Long Overdue Update!
Oops, it's been a while. Life got a little... well, crazy. Anyway, since my last update I've mostly been working on the character sculpts and more research. I've been working my way through Special Effects: The History and Technique by Richard Rickett, which is a really interesting read, I highly recommend it. I've also been working my way through an FxGuide article by Mike Seymour called The Art of Rendering, which has a lot of information about the different renderers and some interesting history as well. Mike Seymour has a couple other good/useful articles as well - The State of Rendering - Part 1 and The State of Rendering - Part 2. It's really amazing to read just how much goes into developing these render engines and how much they have developed over the years.
As far as modeling goes, I'm trying to wrap up all my modeling and sculpting in the next few weeks. This stage has taken a lot longer than I anticipated because I'm still a bit slow and clumsy in ZBrush, but I've definitely learned some good tricks and am starting to get faster. Regardless, I need to wrap it up and move onto the texturing stage - the goal is to finish my thesis by the end of August, so I need to stay on top of everything and keep up a pretty good pace.
As far as modeling goes, I'm trying to wrap up all my modeling and sculpting in the next few weeks. This stage has taken a lot longer than I anticipated because I'm still a bit slow and clumsy in ZBrush, but I've definitely learned some good tricks and am starting to get faster. Regardless, I need to wrap it up and move onto the texturing stage - the goal is to finish my thesis by the end of August, so I need to stay on top of everything and keep up a pretty good pace.
Subscribe to:
Posts (Atom)