For how prevalent Renderman is in the industry, there is a surprising lack of good tutorials on how to actually use the program. Yes there are good resources for specific aspects of the renderer on Professor Malcolm Kesson's Fundza site and of course Pixar's documentation and help forums... but very few actual "this is how you navigate the interface and start using renderman" tutorials. Even the tutorials on Digital Tutors are sadly outdated. Fortunately, I found a youtube channel put together by one Mark Flanagan, comprised of a series of very useful Renderman tutorials that appear to be only a year old, so certainly applicable to most recent versions of the software. Hooray!
https://www.youtube.com/playlist?list=PL-CQuoQkhOn97SMPjmYJCiHVk7tS3bHMD
Sunday, November 9, 2014
Wednesday, October 1, 2014
The Future of Renderman
Earlier this year Pixar announced some big changes to its long time industry work-horse Renderman. Firstly they have completely restructured their pricing so that the renderer is free for non-commerical use and much more affordable for commercial - Pixar and Disney have stated they are moving towards a more open-source approach to encourage further development of the software. More importantly, some exciting new technology has been integrated into Renderman - which is now one software package, combining what was previously Renderman Studio and Renderman Pro Server. With some of the new advances in the rendering techniques, Renderman looks to catch up with the times and provide some stiff competition for renderers like Arnold, which in recent years have proved stronger and more production friendly than the then existing versions of Renderman. Based on some of the demos I watched on the Pixar site, the new Renderman can handle very large sets of geometry fairly effortlessly, even during interactive re-rendering. It also combines uni-directional and bi-directional path tracing to provide more flexibility for accurately and efficiently handling different lighting situations.
FxGuide covers some of the discussion as it stood back in May -
http://www.fxguide.com/featured/rendermanris-and-the-start-of-next-25-years/
And some more up-to-date information on the technology that will be part of the new Renderman directly from Pixar's site -
http://renderman.pixar.com/view/DP25847
The new platform was originally projected to be released sometime around Siggraph this August, but according to a recent email from one of the Pixar sales managers, it looks like it won't actually be released until later this fall.
One section I found especially exciting in the FxGuide article was where Ed Catmull discusses how five major research centers - Pixar, ILM, Disney Research, Disney Animation, and the Carnegie Mellon Lab - are now all working together cooperatively to research and develop new and improved rendering solutions. And with the extra effort they are putting into the future of Renderman, you can be certain other developers and researchers will take notice, and we could see some exciting developments for other render engines and rendering as a whole.
FxGuide interview with Marcos Fajardo
The creator of Arnold talks about his renderer and the future of Solid Angle -
http://www.fxguide.com/fxguidetv/fxguidetv-193-in-depth-with-arnold-creator-marcos-fajardo/
FxGuide also previously did another interview with Marcos back in February -
http://www.fxguide.com/fxpodcasts/fxpodcast-270-solid-angles-marcos-fajardo-on-arnold/
http://www.fxguide.com/fxguidetv/fxguidetv-193-in-depth-with-arnold-creator-marcos-fajardo/
FxGuide also previously did another interview with Marcos back in February -
http://www.fxguide.com/fxpodcasts/fxpodcast-270-solid-angles-marcos-fajardo-on-arnold/
Thursday, September 18, 2014
Some observations for later consideration
We use V-Ray as our primary render engine here at Neoscape, which is great because it's allowing to me to get a much closer look at the ins and outs of how it works in production. I've noticed that some seemingly very small changes can make the difference between a 30 minute render and a 16 hour render (no joke). With that in mind, it would be interesting to do some tests that separate out some individual controls to see how each one specifically effects the render time and quality.
Specifically:
- Color Threshold
- Noise Threshold
- Min/Max Samples
- Adaptive Amount
Specifically:
- Color Threshold
- Noise Threshold
- Min/Max Samples
- Adaptive Amount
Monday, September 15, 2014
Some "Beary" Collectible Rockwells
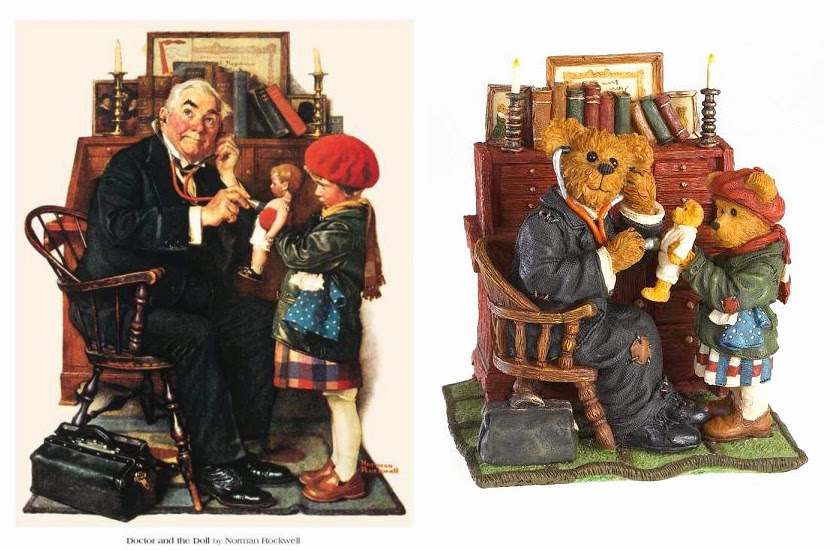
So as I was unpacking a box of trinkets and knick-knacks, I came across this lovely little Boyd's Bear collectible figurine I've had for years. He's a little hockey player done in classic Boyd's style - with torn up clothing and a beat up wooden stick, and very endearing. As I was taking in all the little details, I realized he was an excellent visual reference for the style I'm attempting to achieve - perhaps a little more stylized and exaggerated, but still good reference nonetheless.

Further pondering made me realize I was drawn to the style of the sculpture because it reminded me so much of Rockwell, so much that I began to wonder if perhaps all of the Boyd's Bears were actually inspired by Norman Rockwell's style. A little bit of research and I couldn't find any correlation, at least none that was mentioned. However - I did find that at least three Rockwell tribute bears were created, and you can see in the side by sides how well the two styles work together.
Grandpa's Little Ballerina

Before the Shot/At the Doctor

Doctor and the Doll
Further pondering made me realize I was drawn to the style of the sculpture because it reminded me so much of Rockwell, so much that I began to wonder if perhaps all of the Boyd's Bears were actually inspired by Norman Rockwell's style. A little bit of research and I couldn't find any correlation, at least none that was mentioned. However - I did find that at least three Rockwell tribute bears were created, and you can see in the side by sides how well the two styles work together.
Grandpa's Little Ballerina
Before the Shot/At the Doctor
Doctor and the Doll
Tuesday, September 2, 2014
Academic Paper Resource
Found this page with links to a good list of papers/dissertations/etc relating to rendering and sampling algorithms, etc.
http://www.luxrender.net/wiki/Papers
I was actually specifically looking for a paper by Eric Veach, his 1997 Stanford dissertation Robust Monte Carlo Methods for Light Transport Simulation, for which he was honored by the Academy of Motion Pictures Arts and Sciences (3rd link on the page under "Books"). Interesting tidbit, Veach was also recently honored by the Academy for his work with deep shadow maps that he did at Pixar - nearly 14 years ago!
Monday, August 25, 2014
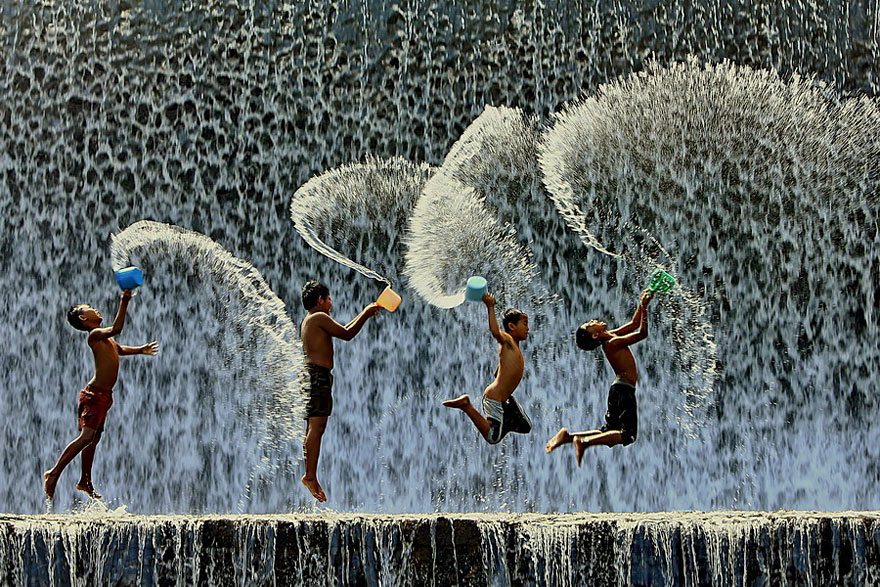
Kids have more fun
Found this post with some amazing photos of children around the world caught in the act of, well, being kids :-) . For one it's a great anatomy and pose reference, since finding good references of children can be difficult (especially in this day and age when unfortunately, an innocent internet search can take you places you don't want to go). Furthermore, I love how these photos manage to capture the emotion of each moment and then seem to freeze them in time, much like Rockwell was able to do in so many of his illustrations.
Monday, August 11, 2014
V-Ray/Arnold Resource
Just stumbled across this website today, the MAXDEPTH page include tutorials and tips/tricks for rendering in both V-Ray and Arnold, as well as a little bit of Zbrush and Mari as well. Looks like a pretty good resource :-)
Also, Grant Warwick's Mastering V-Ray is another good V-Ray resource. The full course costs money, but even the 2 free videos he has posted on the page are quite useful. And although he uses V-Ray for 3ds Max, the general principles are the same and can be applied to V-Ray for Maya (for the most part).
Also, Grant Warwick's Mastering V-Ray is another good V-Ray resource. The full course costs money, but even the 2 free videos he has posted on the page are quite useful. And although he uses V-Ray for 3ds Max, the general principles are the same and can be applied to V-Ray for Maya (for the most part).
Monday, July 28, 2014
V-Ray Material Resource
Came across this excellent resource on the basics of V-Ray materials with renders to illustrate the different attributes. The whole website (viscorbel.com) is overall a good resource. The V-Ray tutorials are all for 3ds Max, but I found most of the principles applied for V-Ray in Maya as well.
http://viscorbel.com/vray-materials-theory/
http://viscorbel.com/vray-materials-theory/
Sunday, July 20, 2014
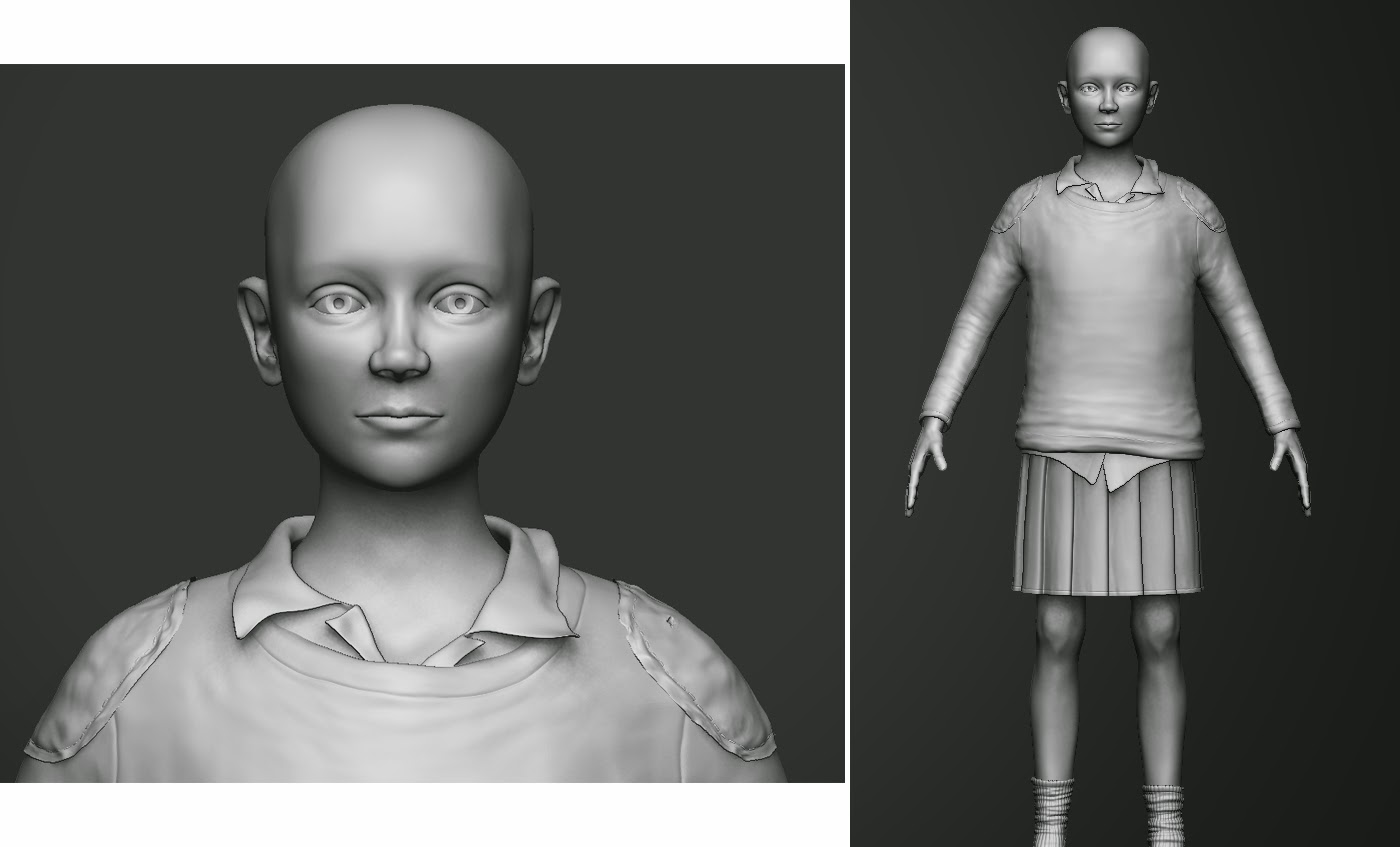
Character Updates
So my characters are pretty much done! Only things left to do are: n-cloth for the clothes, which will be done after rigging/posing; hair, which I am still figuring out how to do; some surface detail on the girl's sweater, which I may end up combining with the texturing process; and the little girl's shoes, which I'm having to re-do no thanks to some major wonky geometry/zbrush issues (which thankfully have been mostly resolved). At this point I'm thinking that fiber-mesh will be the best option for hair. I was examining Rockwell's illustrations, and while his characters tend to be slightly stylized or caricatured, the hair is fairly realistic. Sculpted hair would be much too stylized, and while there is the option of painting transparency maps on planes, it tends to lend itself to "neater" hairstyles, whereas my characters both have messier hair. An added benefit of using fiber-mesh is that since I will have to convert it to geometry in order to have it be compatible with all the render engines, it will allow me the opportunity to see how each one handles such high levels of geometry. While I am confident Arnold will have no issue with it, I am curious to see if Mental Ray can handle it without crashing.

Speaking of hair, obviously because she has none right now, the little girl does look a little odd. But in the few very rough tests I have done she looks much better with hair :-) The hardest part of sculpting these characters for me was trying to make sure their characteristics matched to either male or female. Even though boys and girls around this age do tend to have very similar features, they still needed to be distinguishable from each other. Their outfits are not taken directly from one Rockwell illustration, but rather pieced together from several, as I took some artistic license to envision what they would be wearing in my own interpretation of the "Tackled" piece I am using as my main inspiration.
As soon as I double check all my UVs for stretching, I get to pass these guys on to be rigged, and while that's happening I get to start texturing and shading. I'm hoping that part of the process will be much quicker, since I do feel I have a better idea in my mind of what the textures should look like (whereas with the modeling I wasn't initially sure what direction I was going with the characters' final look).
Thursday, July 10, 2014
Modeling Update - Leather Helmet
Finished up the little boy's old leather football helmet. It still needs some finer surface detail like scuffs and scratches, but again, a lot of that will be created during texturing. As of right now the only thing I need to add model wise is a chin strap (which is honestly something I'll probably do in Maya instead of Zbrush)

Monday, July 7, 2014
Modeling Update - Football
Pretty straightforward model. It looks pretty clean right now, but the extra details in the textures and a good shader will make a big difference in getting it to have that dirty scuffed look (it just has a standard zbrush material on it right now, nothing special). This one will be fun to texture :-)

Renderman!
The wonderful people over at Pixar have been kind enough to provide me with a temporary Renderman Studio 18 license for evaluation purposes, yay! Up to this point I have been using 3Delight, which is based on the Renderman rendering algorithm, and provides a free license - but is not used in the industry nearly as much as Pixar's Renderman. I got excited when I saw Pixar would be releasing a free non-commercial license of 19, but then I realized it won't be released until mid-August, much too late for my purposes. But it gave me the idea to reach out to Pixar and see if they would let me have a free license of 18 to test until 19 is released, since it's really not worth it to pay over $200 for a license I'd only use for a month. The good news is since 3Delight is so similar to Renderman, it shouldn't take too much work to switch over my test scenes, and ultimately I think I'll be much happier with my final comparison.
Thank you Pixar! :-D
Thank you Pixar! :-D
Sunday, July 6, 2014
Modeling Update - Boy Character Progress
Decided to post a WIP of the boy character where he's at right now. I'm trying to finish all my modeling by Friday (July 11), so hopefully the boy and all his assets will be done by tomorrow so I can concentrate on the girl character and all her assets. Obviously right now his sweater is just a shape block with no details added, but when it's done it should closely resemble the old beat-up sweater in the Rockwell illustration. The shorts are another area I took artistic license, choosing to go with the idea of what kids might be wearing if they chose to play an impromptu game of school-yard football. So instead of donning full gear for a serious game, they would just quickly grab a helmet, and maybe throw an old sweater over their uniform. I'm debating if I want the boy to be wearing a collared shirt or not, I may just leave the collared shirt to the girl and have the boy wear a normal crew neck shirt under his sweater, I think it will go more with the look I'm trying to achieve. I also need to break symmetry on the boots, but right now I'm trying to concentrate on getting the rest of the assets detailed before I go back and make more minor tweaks. His hands are also still feeling a bit off, I think they may be a bit too thin, so that's something else I need to tweak before I can say I'm completely done. And then lastly, still debating how I want to do hair - if I want to sculpt it, use planes with transparency, or use fibermesh.

Thursday, July 3, 2014
Modeling Update - Socks
So I took some artistic license with the socks, with the look more geared towards my own interpretation of the piece. After all the final result is basically my spin on the original Rockwell piece, recreating it to reflect aspects of my own childhood experiences. When I was a kid, we always had hand-me-down soccer socks that were either too big or so loose from being worn they would sag and fall down when we ran. So the boy's socks are based off of that, rather than Rockwell's longer, less baggy football socks.

Monday, June 30, 2014
Modeling Update - Boots!
Finished the boots for the male character. The girl character's shoes should be a quicker sculpt, since they are fairly similar in that they are worn leather, probably hand-me downs, the main difference is the style is a lower cut shoe as opposed to an actual boot. I had a fun time making these boots, I've tried modeling shoes in Zbrush before and never had very good results, but I'm pretty pleased with the way these came out :-)
Modeling Reference
Obviously I tried to get as close as possible to the boots illustrated by Rockwell (far left), but since it's a bit more stylized not all the details are visible, so I had to look for similar boots to get reference for some of those smaller details

Boot UVs and Low-Poly Mesh
This will be a good model to test displacement on, typically if was using Mental Ray I would export my next subdivision out of Zbrush, which has a slightly higher poly count and tends to hold displacement details better.

High Poly Zbrush Sculpt
I'll probably end up doing another fine detail pass to layer on top of the existing bump/displacement, but I prefer to make that last pass at the same time as I'm texturing, since alot of the details will come from the color map and it helps me determine how much more detail I need to add to the bump/displacement.

Texture Reference
Obviously the next step for the boots is texturing. Again I will be trying to match as closely as possible the boots pictured in the Rockwell illustration, but I will definitely need leather references to create the final look. These worn leather swatches are fairly close to the look I want.

Friday, June 27, 2014
Long Overdue Update!
Oops, it's been a while. Life got a little... well, crazy. Anyway, since my last update I've mostly been working on the character sculpts and more research. I've been working my way through Special Effects: The History and Technique by Richard Rickett, which is a really interesting read, I highly recommend it. I've also been working my way through an FxGuide article by Mike Seymour called The Art of Rendering, which has a lot of information about the different renderers and some interesting history as well. Mike Seymour has a couple other good/useful articles as well - The State of Rendering - Part 1 and The State of Rendering - Part 2. It's really amazing to read just how much goes into developing these render engines and how much they have developed over the years.
As far as modeling goes, I'm trying to wrap up all my modeling and sculpting in the next few weeks. This stage has taken a lot longer than I anticipated because I'm still a bit slow and clumsy in ZBrush, but I've definitely learned some good tricks and am starting to get faster. Regardless, I need to wrap it up and move onto the texturing stage - the goal is to finish my thesis by the end of August, so I need to stay on top of everything and keep up a pretty good pace.
As far as modeling goes, I'm trying to wrap up all my modeling and sculpting in the next few weeks. This stage has taken a lot longer than I anticipated because I'm still a bit slow and clumsy in ZBrush, but I've definitely learned some good tricks and am starting to get faster. Regardless, I need to wrap it up and move onto the texturing stage - the goal is to finish my thesis by the end of August, so I need to stay on top of everything and keep up a pretty good pace.
Sunday, March 9, 2014
Another awesome SIGGRAPH paper
Stumbled across this gem while doing research for my thesis paper - Painting by Feature: Texture Boundaries for
Example-based Image Creation, presented at SIGGRAPH this past summer (2013). Basically the idea is using images as your palette, as opposed to preset colors and brushes. While the idea of using images to paint from is not necessarily new, the method in which the authors approach it is new, and quite intriguing. The example images are interesting as well, and really showcase the possibilities of this approach.
Monday, February 24, 2014
Simulating Painterly Textures
Interesting tutorial from 3DArtist with some tips on creating painterly textures using 3D painting programs. I don't use ArtRage, but it's something I will definitely play around with in Mari and Photoshop
http://www.3dartistonline.com/news/2014/02/how-do-i-simulate-painterly-textures-in-3d/
http://www.3dartistonline.com/news/2014/02/how-do-i-simulate-painterly-textures-in-3d/
Saturday, February 15, 2014
Color and Lighting Study #1
Took one of the Rockwell pieces I'm going to be attempting to mimic ("Tackled") through photoshop and pulled out some color and lighting information to use as reference when I start my character surfacing and lighting set-up. Something to note is the color palette is primarily earth tones.

Sunday, February 9, 2014
Another Sculpting Update
Making slow but steady progress on the male character. Refined his proportions and started blocking in some basic clothing. Still chipping away at the hands, they look alot better than they did several weeks ago but still need work. Managed to sculpt some pretty nice looking ears, which I'm happy about :-)

 |
| look at that ear! |
Sunday, January 26, 2014
Ears are evil
Well, trying to model or sculpt ears anyhow. Maybe I'm the only one, but I have always had an incredibly difficult time getting ears to look right... but I guess practice makes perfect right? I've been looking at alot of tutorials and modeling breakdowns to get an idea of how other modelers approach ears. It's not that I don't understand the actual anatomy, I just need to figure out a good way to re-create it in CG.
I found this great reference photo from this awesome forum thread, this modeler has been working on a photorealistic human model for the last year and a half, and watching his progress is pretty amazing

I found this great reference photo from this awesome forum thread, this modeler has been working on a photorealistic human model for the last year and a half, and watching his progress is pretty amazing
Thursday, January 23, 2014
New Approach to Non-Photorealistic Rendering?
My friend just linked me to this really interesting article about a new approach Pixar is working on that will make animated characters look actually hand-painted rather than simply being stylized CG. I'm curious to see where this goes, since one of the debates I'm having with my thesis is how I should make my characters look, if I should mimic Rockwell's style exactly and go for a very painterly look, or bring the characters more into the realm of stylized CG and/or stylized realism.
"Pixar Makes Painterly CG"
"Pixar Makes Painterly CG"
Wednesday, January 22, 2014
Render Breakdown
As promised, here's a more detailed breakdown of my lighting and rendering comparison. It would have been too much of a beast to try to make it work in the blog format, so I compiled everything in a PDF file.
click to view PDF
* If you use Chrome, the file will load in the browser instead of downloading *
click to view PDF
* If you use Chrome, the file will load in the browser instead of downloading *
Monday, January 20, 2014
Initial Rendering Comparison
So I was finally able to set up a series of render comparisons between Mental Ray (with unified sampling), V-Ray, Arnold, Mantra and Keyshot. This first comparison was a pretty simple set-up, mostly working with figuring out render settings and different light attributes, since each renderer has it's own specific way of setting up lights. Now I get to move on to more material specific comparisons and see how the renderers handle more complicated shaders like glass and subsurface. I will be posting a more in depth write-up about this first comparison shortly.

** to view image at full resolution, right-click and open image in new tab **
Wednesday, January 15, 2014
Arnold!
So I've been playing with SolidAngle's Arnold renderer and I'm having a blast. It's so simple to use and will get you really nice results pretty quickly. It uses a different method of sampling that lets you keep your renders low quality for quick look development, and then when you're ready to render, you turn up your samples and get a high quality render without worrying about the look changing (ie no need to worry about using low-poly stand-ins or final gather settings, etc). Both Digital Tutors and FxPhd have in depth tutorials on using and optimizing Arnold, but there are some good free tutorials floating around as well. One good one I found was by Sony's Jon Tojek, which manages to cover most of the basics in about 20 minutes. Even though Jon does cover linear workflow in his tutorial, I found another video that is a quick and simple explanation of setting up linear workflow in Arnold, for anyone who doesn't want to scrub through Jon's video to try and find the right section.
Jon Tojek Arnold Tutorial
Linear Workflow In Arnold
Jon Tojek Arnold Tutorial
Linear Workflow In Arnold
Subscribe to:
Posts (Atom)